In this article you will learn the basics of ArgoCD.
Intro
ArgoCD is a declarative, GitOps-based continuous delivery tool for Kubernetes. It automates application deployment and management by syncing the desired state from Git with the actual state in the cluster, ensuring consistency. Key features include self-healing, role-based access, and multi-cluster support, which help simplify Kubernetes operations. You can learn more here: ArgoCD Documentation.
This service is currently in early-access mode. Please contact us to get access.
Installation
Installing ArgoCD is straightforward. Follow these steps to get started:
1. Create a namespace for ArgoCD:
kubectl create ns argocd
2. Apply the latest stable manifest:
kubectl apply -n argocd -f https://raw.githubusercontent.com/argoproj/argo-cd/stable/manifests/install.yaml
First Login
Once initialized, an admin user is created with the password stored in a Kubernetes secret. To retrieve the password, use the following command:
kubectl get secret argocd-initial-admin-secret -n argocd -o jsonpath='{.data.password}' | base64 -d
To access the ArgoCD UI, you can port-forward the service to your local machine using:
kubectl port-forward svc/argocd-server 8080:80 -n argocd
Now, you can access the UI at https://localhost:8080.
Log in with the username admin and the password retrieved from the secret
Adding a new Git Repository
-
Sign in to the ArgoCD web interface.
-
If you are adding a private repository:
-
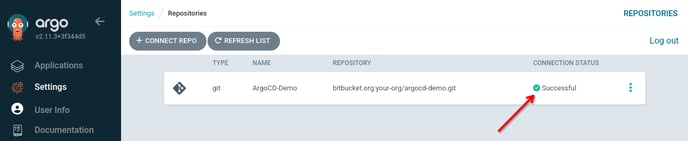
Navigate to "Settings" > "Repositories".
-
Click on "+ Connect Repo".
-
-
We recommend connecting via SSH for security and ease. Enter the repository details:
-
Name: Give it a name.
-
Project: Select a project.
-
Repository URL: Example: http://bitbucket.org:your-org/argocd-demo.git.
-
SSH Private Key: Paste your SSH private key data.
Check your Git provider’s documentation on creating and adding an SSH key if necessary. Refer to the ArgoCD guide for more information on setting up private repositories: Private Repositories - Argo CD - Declarative GitOps CD for Kubernetes
-
-
Click on "Connect", check if the "Connection Status is successful, if not you did something wrong.
Using a Manifest file:
apiVersion: v1
kind: Secret
metadata:
  name: argo-demo-app-prod
  namespace: argocd
  labels:
    argocd.argoproj.io/secret-type: repository
stringData:
  url: ssh://git@bitbucket.org:22/xelonvdc/argocd-demo.git
  sshPrivateKey: |
      -----BEGIN OPENSSH PRIVATE KEY-----
      ...
      -----END OPENSSH PRIVATE KEY-----
  insecure: "true" # Do not perform a host key check for the server. Defaults to "false"
  enableLfs: "false" # Enable git-lfs for this repository. Defaults to "false"
Be aware that you must have added your Public SSH Key to your git repository. Best Practise is to generate a new Keypair per Cluster.
Adding a new Application from Git
To add a new Application from a public git repository you can simply press “+ New App” in the UI.
.png?width=688&height=221&name=grafik-20240930-214231%20(1).png)
While most of the settings in ArgoCD are straightforward, here are the key options to focus on:
GENERAL:
-
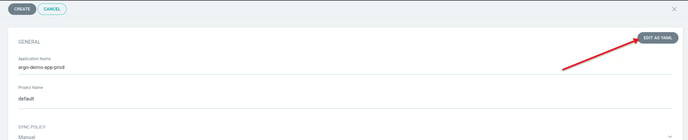
Name: Choose a name that fits your application's purpose. For example: argo-demo-app-prod.
-
Project Name: In this case, select default unless you have specific projects created.
-
Sync Policy:
-
Manual Sync: For now, select "Manual". This means that you'll need to manually apply changes to the cluster, though ArgoCD will still notify you if the cluster is out of sync with the Git repository.
-
Automatic Sync: If selected, ArgoCD will automatically apply changes to the cluster as soon as they are detected in the repository.
-
-
Sync Options:
-
Auto-Create Namespace: Enable this option so that ArgoCD automatically creates the namespace if it doesn't already exist. The other sync options are more advanced and can be configured later based on your needs.
-
SOURCE:
-
Repository URL: If you've already configured the repository earlier, you can simply select it from the available options.
-
Path: Choose the relative path to your application. For example:
cluster/demo-cluster/demo-app-prod/ArgoDemoApp
DESTINATION:
-
Cluster URL: Use https://kubernetes.default.svc, which is the internal Kubernetes domain that points to the Kubernetes API service (ClusterIP) in the default namespace.
-
Namespace: Assign a namespace for deployment. In this example, you can use demo-app-prod.
Using a Manifest file:
You can also configure ArgoCD applications by applying a manifest file. Since ArgoCD Applications are Custom Resource Definitions (CRDs), they are included with the default installation.
To get the YAML configuration:
-
Navigate to the ArgoCD UI.
-
Click "Edit as YAML" on the application.
-
You’ll be presented with the YAML, which you can modify and use to configure the application declaratively.
Manifest:
apiVersion: argoproj.io/v1alpha1
kind: Application
metadata:
  name: argo-demo-app-prod
  namespace: argocd
spec:
  project: default
  source:
    repoURL: 'bitbucket.org:xelonvdc/argocd-demo.git'
    path: cluster/demo-cluster/demo-app-prod/ArgoDemoApp
    targetRevision: HEAD
  destination:
    server: 'https://kubernetes.default.svc'
    namespace: demo-app-prod
  syncPolicy:
    syncOptions:
      - CreateNamespace=true
Deploying first Application
For this demonstration, we will deploy a simple web server and a load balancer. Follow these steps:
1. Prepare the Manifests
a. Place the following YAML files in the correct directory based on the structure you are using for your ArgoCD repository.
b. Webserver.yaml:
apiVersion: apps/v1
kind: Deployment
metadata:
  name: whoami
  labels:
    app: whoami
spec:
  replicas: 3
  selector:
    matchLabels:
      app: whoami
  template:
    metadata:
      labels:
        app: whoami
    spec:
      containers:
      - name: whoami
        image: traefik/whoami:latest
        ports:
        - containerPort: 80
        resources:
          requests:
            memory: "64Mi"
            cpu: "250m"
          limits:
            memory: "128Mi"
            cpu: "500m"
c. Loadbalancer.yaml
apiVersion: v1
kind: Service
metadata:
  name: whoami-svc-lb
spec:
  selector:
    app: whoami
  ports:
    - port: 8002
      targetPort: 80
      protocol: TCP
  type: LoadBalancer
2. Push Changes to the Git Repository
Once the YAML files are ready, push them to your Git repository in the appropriate folder based on your repository structure.
3. Syncing the Changes in ArgoCD
If you haven't enabled Auto Sync for this ArgoCD application, you will need to manually synchronize the changes:
-
-
Go to the ArgoCD Web Interface.
-
Navigate to "Applications".
-
Click on "Sync" for the desired application.
-
In the new window, press "Synchronize" to apply the changes.
-

ArgoCD Git Repository Structure
The repository structure in ArgoCD is flexible, but here is a recommended setup:
-
Use a dedicated repository for all your ArgoCD configurations.
-
If you manage multiple customers or application clusters, consider splitting the single mono repository into multiple repositories. This way, each end customer can have limited access to their respective repositories.
Example Directory Structure:
<Repository>
    └── cluster
        └── <clustername>
            └── <namespace>
                └── <Applicationname>
                    └── <Manifestfiles>
This design might be overkill for basic systems but is scalable and easy to manage as your infrastructure grows.